Hello! below you'll find information and a walkthrough on the new Scenario Creator, along with the updated Map Editor.
Scenario tool, what is it?? Well, this tool provides a visual interface to the user that will allow someone to quickly set up and customize scenarios without the need to edit files within a text editor. You can easily set the scenario name, WMDATA, unit properties, news items, etc.
The walkthrough… (How I created the map Arena 4A)
To Start, we’ll need to launch the Scenario Creator. On start up you’ll be brought to the Help screen which indicates the files relevant to this tool. It also has some useful links. To continue, click the Next button.
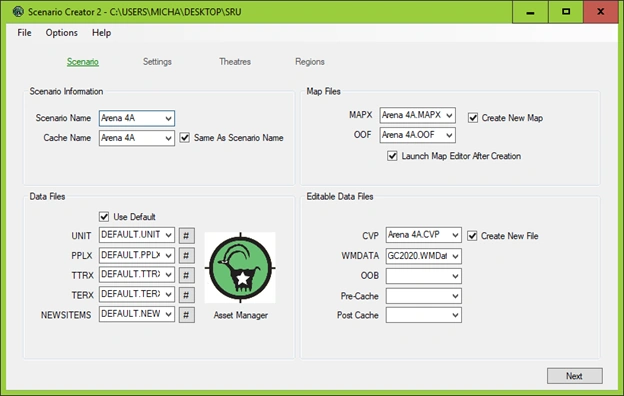
The First step is to enter a scenario name, as you do this, you’ll see the Cache name, MAPX, OOF, and CVP sections filled in automatically (these can be changed manually if desired). The Second step is to choose the WMDATA file in the Editable Data Files section. The WMDATA file contains World Market/Economy information of the era you would like to play in, in this case we will click the dropdown arrow and choose the GC2020.WMDATA file for a modern era (see Screenshot 1 below). OPTIONAL At this point nothing else needs to be changed, but if you wanted to you could edit the DEFAULT files in the Data Files section using the Asset Manager tool by clicking the # symbol beside each file.
Screenshot 1- Scenario
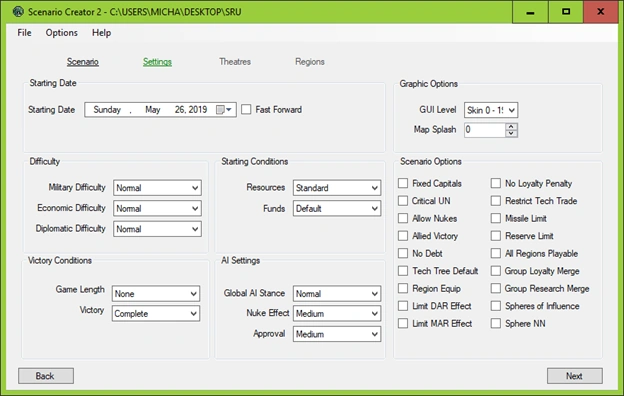
Once the Next button has been pressed, you’ll be brought to the Settings (see Screenshot 2 below). This screen allows you to edit the default game settings for the scenario you are creating. The only setting we’ll be changing in this walkthrough is the Game Length by setting it to None. Note these are only the default settings, they can be changed within the game itself.
Screenshot 2- Settings
The Next button can now be pressed which will bring us to the Theatre. This section allows us to import regions from a .CVP file. Because we already choose a WMDATA file that is in a modern era, we will choose a .CVP file that has modern regions. To do this, Click the Import From CVP File button, then click on the W2020.CVP file. Now click open to finish the import (see Screenshot 3 & Screenshot 4 below).
Screenshot 3 - Import From CVP File
Screenshot 4 - Theatres
We can now click the next button which will bring us to the Regions section. Here we have the option to create new custom regions or merge in existing regions from another scenario. To keep things simple we will merge in our regions, click the Merge From CVP button. In the pop-up window, the File name will already be filled in (see Screenshot 5 below).
Screenshot 5 - Merge From CVP
Now click Open and a new window will open called Merge Regions From CVP File. This is where you can select all the regions you desire to have available in your scenario. To select a region, click the Checkbox beside the region you wish to include. For this scenario I checked the regions Moscow, Marseille, Taiwan, and Massachusetts (see Screenshot 6 below).
Screenshot 6 - Merge Regions from CVP file
After all regions are checked, click on the Merge button. This will bring us back to the Regions section (see Screenshot 7 below).
Screenshot 7 - Regions
The Final Step is to click the export button. A confirmation dialog will display and you can click OK to finish. By default, the map editor will launch.
...on to the map editor
The main talking points for this part of the walkthrough will be focused on the newly added Procedural Generation options.
To start you’ll have to load the Arena. Next step is to set the MAP SETTINGS. Because Arena 4A is meant for 4 players, set the Map Width and Map Height to 200. Clear the Background Image Name, as it is not needed, and toggle off the Background Image button. Finally, toggle on the Cylindrical World button and then click Apply (See Screenshot 8 below).
Screenshot 8 - Map Settings
Now click on the Cities tab, what you’ll see is 5 buttons that all have a magic wand image on them, these are used for the procedural generation. One is Red (Resets all your procedural settings), 3 are Blue/Green (Used to adjust the procedural settings), and one is Yellow (Used to procedurally generate the map). See Screenshot 9 below.
Screenshot 9 - Map Settings
For the Arena 4A map, the first settings adjusted were the Geometry Variables. Click the first (top most) Blue/Green Wand button to open the Geometry Variables window. The only change to make is to set the Sea Level to -0.02. Setting the sea level to a lower level will increase the amount of land on the map, where as increasing it will reduce the amount of land (creating more islands). See screenshot 10 below.
Screenshot 10 - Set Geometry Settings
When finished with the Geometry Variables, click outside of the window to close it. Now Click the 2nd Blue/Green Wand button to open the Environment Variables window. For these settings I adjusted all 3 of the Humidity Threshold settings to modify the amount of light forest, heavy forest, and jungles that will be present on the map. I also adjusted all of the Altitude Thresholds to reduce the amount of shore, hills, and mountains present (See Screenshot 11 below). IMPORTANT NOTE All three of the Humidity Thresholds are related to each other, and the same for the Altitude Thresholds. For example, the value of the first Humidity Threshold is represented by its distance from the left. The value of the second Humidity Threshold is represented by the distance between the first and second Humidity Thresholds. The value of the third Humidity Threshold is represented by the distance between the second and third Humidity Thresholds. The same concept applies for the Altitude Thresholds. Because of this, you will notice that when adjusting a related Threshold to be a higher value than the one/s below it, the one/s below will automatically increase to be the same value.
Screenshot 11 - Environment Variables
When finished with the Environment Variables, click outside of the window to close it. Now click on the last (bottom) Blue/Green Wand button to open up the Civilization Variables. The only settings that need to be adjusted here are the Regions (set to 4) and Cities (set to 394). The cities variable is the total number of cities on the map. I find it best to set the Cities to include around 100 cities per region, meaning if there are 4 regions then 4 x 100 = 400 (See Screenshot 12 below). NOTE Some settings can be hard to adjust with the mouse, to help with this you can hover the mouse over the Slider of the setting you would like to adjust and then HOLD alt and SCROLL using the mouse wheel.
Screenshot 12 - Civilizations Variables
When finished with the Civilization Variables, click outside of the window to close it. To generate the map, click on the Yellow Wand button. Last step, you’ll need to click on the Save Map button on the left before you exit the map editor.
And there you have it, you’ve just procedurally generated a map!
General Notes
- The first time you launch a new map, the game will create a cache for that map.
- If you don't like how the map was generated, you can keep pressing the Procedural Generation button (Yellow Wand) to regenerate maps until you get one you like.
- The procedural generation isn’t perfect, sometimes you’ll have to manually edit the map yourself to get it to the way you would like it.
- Play around with the settings, it takes some time to get a feel for how certain settings affect the overall map.
- Sometimes setting the number of cities too high can cause the map editor to crash. We are still evaluating the minimum and maximum range for many of the variables.
- Make sure you don't set the number of Regions in the map editor higher than the number of regions you selected for the Scenario. This will cause the map editor to crash.
- Roads and rails will only be placed on the single largest landmass generated.
- The scenario tool will look for and use your default install directory for the game, but it is possible to change this along with where the scenario should be exported. To do so, simply click on the Options button at the top of the Scenario Creator and navigate to Change Working Directory or Export Scenario To (See Screenshot 13 and Screenshot 14 below).
Screenshot 13 - Change Working Directory
Screenshot 14 - Export Scenario To
Happy Map Making!